Spinach, Bacon and Cheese Frittata

(Oops.. this should have been my June post. Um.)

In keeping with my no-junk week, I wanted something proteiny I could have in the fridge, cut chunks of, and eat hot or cold. I’m also obsessed with spinach at the moment for some reason. So this fit the bill. I made up the recipe to fit what I had on hand, but it’s not greatly different from many out there, I think. I don’t really measure when I’m making things up, unfortunately, so the amounts are estimates.

One other thing – it’s not truly a frittata, as I don’t have a pan that will go from hob to oven. So I cooked the things that needed cooking first, then put the whole lot in a baking tin.

Ingredients
6 eggs
1 cup grated cheddar
1/3 cup milk
2 cups spinach, cooked and drained
1 small onion (I used a fat shallot I had lurking in the fridge)
4 rashers smoked streaky bacon
1 clove garlic, crushed
1/2 tsp Herbes de Provence
Good grind of black pepper

Method
1. Chop the bacon and onion small and fry together until onion is translucent and bacon is cooked through.
2. Add the garlic and spinach and stir well together. Set aside.
3. In a bowl, beat the eggs with the milk.
4. Beat in the herbs and pepper, then stir the cheese in thoroughly.
5. Tip the spinach mixture into a baking receptacle (I used a tall round 8″ cake tin, but anything will do, really. Not too big, this should be quite thick).
6. Carefully pour the egg mixture over it and stir gently to distribute the spinach and cheese
7. Bake at 160C (fan – adjust as required) for about 40 minutes. It should be golden brown on top and set, cooked all the way through.
8. Remove from oven and let it settle. Slice and serve!

This thing is an Atkins delight, and very concentrated. Start with a small slice! When cool, it will hold together beautifully and should keep for two or three days in the fridge. I plan to have a chunk of it for breakfast tomorrow!

Green Lentils with Bacon

For some inexplicable reason, my system has decided it wants aggressively healthy food this week. Possibly in self defence, shoring up its stocks of vitamins in preparation for what is likely to be a weekend of cake, but who knows. In any case – I have avoided carbs of all sorts, and ventured into unfamiliar territory.

Lentils, of course, the small red variety, are a staple in my kitchen but generally turn up in soup. Split peas likewise. I have really never had much to do with green lentils; never knowingly encountered them, and certainly never cooked anything involving them. So my sudden desire for chicken, spinach, and green lentils with bacon came completely out of nowhere. It hit so fast that I didn’t even think to take pictures until it was all done – and to be fair, it doesn’t take a lot of doing. No fancy stages, no lengthy prep or cooking – at least not the way I did it – just a delicious side dinner.

Ingredients
1 can green lentils (or prepare them yourself, I guess – about a cup?)
4 rashers streaky smoked bacon
1 stick celery
1 clove garlic
a dash of oil
1 tsp bouillon powder (I used Maggi)
sprinkle of Herbes de Provence

Method
1. Dice the onion, celery and bacon small. Fry up the bacon until fat starts to come out of it; if very dry, add a dash of oil and then add the onions and celery.
2. Fry together until the onion goes translucent
3. Drain and add the lentils and give it a good stir around
4. Add the bouillon powder, herbs and a healthy dash of water to moisten
5. Cook for about another 5 mins til all heated through and flavours melded

Not pretty*, but so tasty! I had this as a dual protein with a pounded, lemon/garlic chicken breast, and a pile of spinach. Fantastic – enough to make me think adding spinach to the lentil/bacon mix would be a winner in itself. It’s even better reheated the next day.

(*I do have a picture. I’m debating adding it! Maybe later….)

Not pretty. But oh so tasty.

No Pastry Pear Tartlets

What can I say – these sounded delicious, and I haven’t made tartlets of any sort before. Simple, quick, and best of all – no pastry to worry over. They also use icing sugar in place of regular, which I haven’t seen before. I had all the ingredients on hand, so I thought I’d try them.

I only have 4 tartlet pans, so I adjusted the amounts.

Ingredients:
120g butter
45g plain flour
120g icing sugar
65g ground almonds
2 large eggs, beaten
2 small pears, thinly sliced

Method:
Preheat oven to 200C, and butter the tartlet tins.
Melt the butter.
Sift flour and sugar together, then stir in the ground almonds. (I actually didn’t sift anything – it all turned out fine).
Mix in the butter and eggs.
Divide between the tins and place pear slices on top. (I only used one pear, and put a sliced quarter on each tin.)
Bake 10 mins.
Turn the oven down to 170C and back a further 5 mins, or until evenly golden brown.

Yummy.

These were indeed delicious; I was a little surprised that there was no spice, no vanilla, just that very short ingredient list, but they’re perfect. Buttery, crisp at the edges, dense and cakey, they would work equally well with other fruit I think – maybe plums or raspberries, anything sweet and juicy like that. Sadly the pear I used wasn’t nearly as ripe as I thought, so that aspect was a bit disappointing. I shall try again with a much riper one!

Also point to note – even cut down, this made more mixture than would fit comfortably in the tins. I took the precaution of setting the little tins in a bigger roasting pan and it’s just as well; the one in the photo was the only one that didn’t overflow, volcano-like.

Turkey Meatloaf

Meatloaf really hasn’t been a feature in my life. My vague impressions of it have been less than favourable and there’s no family tradition for a “good one”. So I have a sort of distant curiosity about why it’s so massively popular, and of course I’m interested in the million variations that turn up again and again on the web.

Then I saw a recipe for turkey meatloaf that rang a few of my bells. Lots of fresh veggies. Turkey, not a heavy mass of beef, or the abominable pork/beef mixture. Mozzarella on the top! Garlic and courgette and onions and oregano.. okay, time for an experiment.

Of course, I am incapable of following a recipe perfectly. I nearly sprain something when I try – which I will do, if it’s cakes or some other incomprehensible wizardry – but savoury? Meat? Hah! I rolled up my sleeves and made it up as I went along, using this recipe as a general inspiration more than an exact guide.

Most of the ingredients!

Ingredients:
The meatloaf:
500g ground turkey
Half a midsize courgette, grated
Half a midsize red pepper, diced small
1 celery stalk, diced small
Half a medium onion, diced small
1 slice bread, torn into crumbs
Large handful of flat parsley (leaves only), chopped
2 cloves garlic, crushed
1 large egg
2 tbl milk
1 tbl oil
Generous shake of oregano
Generous grind of black pepper

The topping:
1 tub pasta sauce, I used a Mediterranean Vegetable one.
a generous handful of grated mozzarella

Pre topping. I put the whole tub on.

Method:
Preheat the oven to 180C.
Beat together the egg, milk and oil.
Mix all the meatloaf ingredients in a large bowl, not too hard. I used a fork and a fairly light touch. You don’t want to make a great heavy mass, just get everything combined.
Tip into a loaf pan (I did give mine a spray with oil) and spread it out evenly. I used a 2lb pan so it only came up about half way. Don’t press it down too hard.
Top with the pasta sauce.
Pop into the oven and bake for 40 mins.
Take it out, sprinkle the mozzarella over the top and return to oven for 10 mins.

Not sure how you take appetising pictures of meatloaf…. maybe I should have slathered extra sauce over it!

Verdict: tasty but a slightly odd grainy texture – from the courgette, I think. Falls apart fairly easily, which is a good thing (not too dense) as well as a less good one (not sure how well it will slice cold). The sauce makes it; next time I’ll definitely reserve some extra for serving. I understand meatloaf is traditionally served with mashed potatoes, and that would be awesome. 🙂

Chocolate Baked Alaska

Because everything is better with chocolate….

I remember my mum making baked alaska when I was little. Once. Not sure why she never made it again because I seem to remember thinking it was awesome. And when discussing how best to charm the Mother-In-Law, hubby decided that baked alaska sounded like an Impressive Thing. So here we go.

Ingredients

Chocolate Sauce
100g caster sugar
100g butter
1 vanilla pod, seeds scraped out
125g 70% cocoa chocolate
75ml water
1 tbsp cocoa

baked alaska
ready made chocolate brownies (I used a full pack of Gu brownies)
50ml vanilla liqueur
3 large scoops of good quality chocolate icecream
3 large scoops of good quality vanilla icecream
3 egg whites
75g caster sugar

1. Preheat oven to 220C/425F/Gas7.

2. Chocolate sauce: Place sugar, butter and vanilla seeds in to a saucepan and heat over a medium heat until melted and combined.

3. Add chocolate, water and cocoa and heat for about 6-8 minutes until chocolate melted and sauce is thick and glossy.

4. Baked alaska: Crumble brownies and press in to the base of an 8″ oven-proof dish.

5. Drizzle over vanilla liqueur, then add a couple of tablespoons of the chocolate sauce.

6. Pile icecream in the centre, away from the edges, and then place in freezer to keep chilled.

7. Whisk egg whites with 25g of the sugar until thickened. Add 25g more of sugar and whisk until combined. Add the remaining sugar and whisk until the mixture forms stiff peaks.

8. Remove dish from freezer and spoon meringue over the icecream, making sure the icecream is completely covered.

9. Bake in oven for 3-4 minutes until meringue starts turning golden brown.

10. Serve with generous quantities of chocolate sauce.

Serves 4

Asparagus Wrapped in Parma Ham with Hollandaise Sauce

Mothers Day is upon us and so the time has come to gain faction with the Mother-In-Law. Hubby is sorting out the main course, leaving me to handle the starter and dessert. So first up, given she’s rather fond of asparagus, I’m trying this out.

Ingredients
12 Asaparagus spears
12 slices of Parma ham

Hollandaise Sauce
2 large eggs, separated
1 dessert spoon lemon juice
1 dessert spoon white wine vinegar
110g butter
salt and pepper

1. Preheat the oven to 200C/392F/Gas6.

2. Place each asparagus spear lengthways across a slice of Parma ham and roll up to completely envelop the asparagus.

3. Place asparagus and ham parcels on a baking tray and bake in the oven for 10-12 minutes until ham is crisp.

4. Place egg yolks in a bowl with a pinch of salt and pepper and blend thoroughly with a food processor or blender for one minute.

5. Put lemon juice and vinegar in a saucepan and heat until the mixture starts to bubble and simmer.

6. Switch on blender and pour lemon/vinegar mixture in to egg yolks in slow steady stream. Switch blender off again.

7. Using the same saucepan, heat the butter over a gentle heat, being careful not to let it brown. When butter is foaming, switch the blender on and pour in the butter in a thin, slow trickle.

8. When all the butter is incorporated, turn the blender off and wipe around the sides of the bowl with a spatula to get all the sauce, then blend one last time to incorporate it all.

9. In a separate, clean bowl, whisk the egg whites until they form peaks. Fold in to sauce immediately and serve.

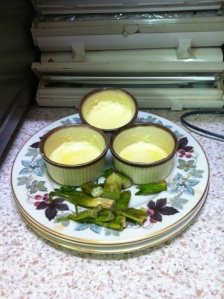
And I was so eager to get eating that I forgot to take a picture of the finished product, so here’s a picture of the leftovers:

Cheese Souffle Blinis with Scrambled Egg and Bacon

Using my TARDIS (mine looks like a walk-in fridge, and on the inside has an entire supermarket) I have travelled forward from the 8th March when I cooked this, to some time in early April to write it up. Once I’m done I’ll pop back to the end of March just to make sure I post it in time to meet the March deadline. Simples!

So, on pancake day, a mere five minutes ago for me due to the timey-wimey shenanigans, I wanted to try something a little bit different, so I found a recipe and then completely rewrote it a bit so that I could just get away with using things already in the kitchen and not have to go to the supermarket (someone else had the TARDIS that day).

Ingredients
170g plain flour
2tsp baking powder
salt and pepper
290ml milk
2tsp mustard powder
150g grated strong cheddar cheese
small handful of fresh chopped chives
8 eggs
butter
bacon

1. Mix the flour, baking powder, milk and a pinch of salt and pepper in to a smooth batter.

2. Add the cheese, mustard and most of the chives (keep some for garnish at the end) and mix until well combined.

3. Separate the whites from 4 eggs in to a seperate bowl (keep the yolks for later) and whisk until they form peaks.

4. Gradually fold the egg whites in to the batter using a metal spoon.

5. Melt a knob of butter in a frying pan over a medium-high heat, then spoon in the pancake mixture to make pancakes of about 10cm diameter.

6. Fry in batches for 2-3 minutes, then turn over and fry for another 1-2 minutes. Keep going until all the batter is used up and then put the blinis somewhere to keep warm.

7. Cook the bacon however you prefer, I grilled mine. For the scrambled eggs… I added the leftover yolks to the other four eggs which made it an amazingly vibrant yellow colour, but it was also quite dense, even with a lot of whisking. I’d probably just leave them out if I did it again.

8. Arrange in an incredibly artistic pile on a plate and garnish with chives (or forget and find them on the chopping board later).

Cheddar Blinis

Serves 4

Mocha Orange Brownies

Here we are again, right up at the end of the month and no recipe posted! Panic! Then these brownies caught my eye; mm chocolate and orange, and with the added attraction of not requiring a shopping trip for ingredients.

Normally I’m happy with my regular brownies, recipe refined over the years, but these sounded so yummy (and easy! One pan – win!) that I had to give them a try. They’re also completely different to my usual sort, using cocoa/coffee instead of melted choc.

As usual, I’ve converted the amounts and/or fiddled the ingredients to be UK-friendly.

Ingredients:
150g butter
65g cocoa
1 tsp instant coffee granules
200g sugar
2 eggs
1 tsp vanilla
110g flour
100g dark choc chips
1 tsp orange zest*

(* My oranges refused to cooperate so I substituted a tsp of orange extract.)

Method:
1. Preheat oven to 180C and grease/flour a brownie pan.
2. Melt the butter in a medium saucepan. Remove from heat.
3. Stir in the coffee and cocoa and mix well to dissolve. Take a moment to inhale in bliss.
4. Stir in the sugar, then the eggs one at a time. Be prepared to stir hard; the mixture will seize in a worrying way. I added a half-handful of the flour between eggs to prevent what I feared might be scrambling.
5. Stir in vanilla and give it a good mix.
6. Stir in the flour, chocolate chips and orange. Take another moment to stand and sniff. Yum.
7. Spread the gloriously dark, gooey batter in the prepared pan and bake for ~30 mins. (25 in a fan oven did the job nicely).
8. Let cool in the pan. (Hah!) Sift a little icing sugar over the top to serve.

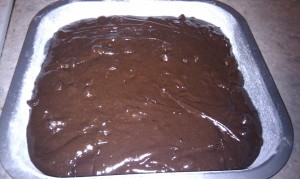
Batter in the panI used an 8×8 pan and worried that it might be overfull, but it turned out fine, it’s not a big riser.

Brownie on a plate

Verdict:
Fudgy and squishy and very rich. Definitely a keeper, well suited for serving with ice cream as a last-minute omg-I-forgot dessert. Extra bonus points for ease of assembly and using ingredients you likely have on hand.

Chocolate Whoopie Pies with Wattleseed Buttercream Filling

I’ve wanted to make whoopie pies for ages; so cute! And like little, flat, filled cupcakes, you can make them in almost any flavour combination. I’ve also been wondering about using wattleseed in a frosting. As usual with me, I went and found half a dozen recipes and picked one that looked good (Buns In My Oven) and then hacked it.

Unfortunately I was so mesmerised by the delicious pictures and so preoccupied with anxiety over the meringue buttercream, that I failed to absorb the level of faff factor involved. OMG. I had no buttermilk, so improvised. And then when it came to the frosting, my assumed two boxes of eggs turned out to be four eggs poorly distributed; so I went with no-meringue buttercream instead 🙂 So be warned. This recipe will use ALL THE BOWLS. And make sure you have everything you need, before you start 😉

Last note: the recipe calls the cake drops “cookies”. I maintain that like the proprietary brand with the smashing orangey bit, these are in fact cakes. Tasty, tasty cakes…

For the cake drops:
425g plain flour
1/4 tsp salt
1 1/4 tsp baking powder
2 tsp baking soda
40g cocoa
1 cup strong brewed coffee
250g light brown sugar
3/4 cup oil
1 large egg
1 tsp vanilla
1/2 cup milk

Preheat the oven to 180C and line two baking sheets with parchment. (Or just use nonstick, or silpat. If you use parchment you will need many sheets ready.)
In a large bowl, whisk together the flour, salt, baking soda and baking powder. Set aside.
In another large bowl or jug, whisk together the cocoa and hot coffee until completely combined and dissolved.
In a medium bowl (!), stir together the brown sugar and oil. Ick. Add this to the cocoa mixture and whisk until combined.
Add the egg, vanilla and milk and whisk again until well mixed and combined.
Mix the wet ingredients into the dry and combine well. (The recipe says to fold gently, but I just used the same old whisk and gave it a good stir around. Did no harm..)
Now the tricky part. Drop dessert-spoonfulls of the mixture on to the prepared baking sheets, leaving some space for spreading. I found it nigh impossible to make them all the same size; a sized scoop might help. I also tried piping, but that turned out to be no better than just glooping it out with a spoon. The mixture is very runny and sticky as hell. Good luck.
Bake for 10 – 15 mins, until the cakelets bounce back and a toothpick inserted in the centre comes out clean. (Note: mine took exactly 9 minutes in a fan oven.)
Recipe says to let cool in tray. I have no idea what kind of huge-ass trays the lady has but there was no way that mix makes one batch. I let them cool a little, then spatula’ed them off to a cooling rack, de-crumbed the trays and reused until done. This amount of mixture made four batches of 12 cakelets. (48 cakes; 24 pies). If you are using parchment, be aware.
Note: try to keep them flat while cooling, as they will bend unnervingly. I had to pile mine; that also made the nice smooth tops all crumby 😦

For the filling: (the one I used)
5 oz softened butter
11 oz icing sugar, sifted
5 tsp wattleseed essence (made by brewing it strong through my Aeropress).

In a large bowl beat together the butter and half the sugar, gradually adding more sugar as it combines.
Add the wattleseed essence and beat in well; add more sugar if the frosting gets too soft.

To assemble the whoopie pies, first match up similar sized cakelets in pairs. Working pair by pair, butter the frosting on to one (flat face), then sandwich together with its buddy. You can pipe the buttercream, but it was a nice spreadable consistency, and the cakelets were sturdy enough to hold, so seemed far easier just to plaster it on. Be generous, the frosting makes more than enough 🙂

The dark, slightly bitter-chocolate of the cakes goes extremely well with the wattleseed buttercream, as I hoped. Yummo!

Lemon Poppy Seed Kugelhopf Cake

My sister gave me a copy of Sarah Raven’s Food For Friends And Family for my birthday. What a lovely book; wonderful pictures, and lots and lots of interesting recipes which my sister has assured me work very well, even if they sound a bit unusual.

So given that my sis was spending the day with me today, we decided to make something from the book. I only realised I could blog it when the batter was pretty much already made, so the pictures start half way. 🙂

Ingredients:
225g soft light brown sugar
225g softened butter
4 eggs, beaten
225g self-raising flour
grated zest of 2 lemons, juice of 1
1 tablespoon poppy seeds
2 tablespoons milk

For the syrup:
juice of 1 lemon
3 tablespoons icing sugar, sifted

For the icing:
7 tablespoons icing sugar, sifted
1 tablespoon lemon juice
lemon strands, for sprinkling on the top

Preheat the oven to 180C/gas mark 4. Lightly grease and flour a kugelhopf cake tin or a 23cm springform tin.
Put the sugar and butter into a large mixing bowl and beat together until light and fluffy. Gradually stir in the beaten egg and flour (alternating the two).
Then stir in the lemon juice, lemon zest, poppyseeds and milk.
Spoon into the prepared tin and smooth the mixture down with a rubber spatula or palette knife.

Smoothed

Place in the middle of the oven and bake for 45 – 50 minutes, until firm. Cool in the tin for 10 minutes.
Meanwhile, make the syrup by stirring together the lemon juice and icing sugar in a small bowl*.
Using a skewer, prick the top of the cake and pour over the syrup.

Glisteny!

Allow the cake to cool completely in the tin. When cool turn out on to a serving plate.
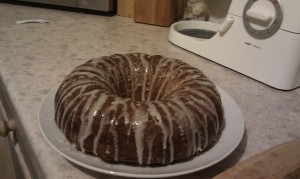
Next make the icing. Mix together the icing sugar, lemon juice and 1 tablespoon of water and pour over the top of the cake, allowing the icing to trickle down and sides (if using a springform cake tin, do the same but smooth the icing over the top of the cake with a palette knight). Sprinkle the top with the lemon strands.

Makes enough for 8 – 10.

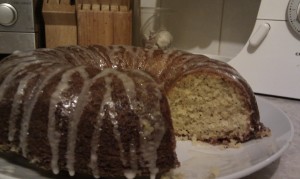
This is surprisingly light, and really yummy. Lemony and buttery, not overly sweet, very moreish. Yum!


(* Add the lemon juice just a little at a time, make a fondant and then dilute it, or it’ll go sort of blobby.)

Previous Older Entries Next Newer Entries